
Before continuing with this tutorial please check -
Advertising basics - format and costs
In order to create and import ads you will need to download our software and
become a User.
Every new User is rewarded with tokens. There are multiple other token rewards.
Our software for Users run on 3 desktop platforms - Windows, Mac OS and Linux, and one mobile platform - Android. Creating, importing and test
showing is available on our 3 desktop platforms but not on Android.
We did create 3 different sample ads. These ads have 1 , 3 and 5 pages each respectively. To help with this tutorial we packed -
files for sample ads.
, you can download and view each of the ingredient files used to making of an ad.
The folder contains the 1,3,5 pages demo ads - ad1.img, ad3.img, ad5.img .
Ads consist of 1 to 5 image files and a JSON format text file named - ad.txt .
The 1 page ad was created using these files - ad1.ppm, ad.txt .
The content of ad.txt is as follows -
{ "page1":"ad1.ppm", "action-txt":"ContactUs", "action-url":"https://decentralizeweb.org/ad1.htm" }
The 3 pages ad was created using these files - ad3a.ppm, ad3b.ppm, ad3c.ppm, ad.txt .
The content of ad.txt is as follows -
{ "page1":"ad3a.ppm", "page2":"ad3b.ppm", "page3":"ad3c.ppm", "action-txt":"Tell me more", "action-url":"https://decentralizeweb.org/ad3.htm" }
The 5 pages ad was created using these files - ad5a.ppm, ad5b.ppm, ad5c.ppm, ad5d.ppm, ad5e.ppm, ad.txt .
The content of ad.txt is as follows -
{ "page1":"ad5a.ppm", "page2":"ad5b.ppm", "page3":"ad5c.ppm", "page4":"ad5d.ppm", "page5":"ad5e.ppm", "action-txt":"Platform details",
"action-url":"https://decentralizeweb.org/ad5.htm" }
The dWeb program is reading all of the files of an ad then packs them in a single file, compresses it and writes the result to a file with a name -
ad.img .
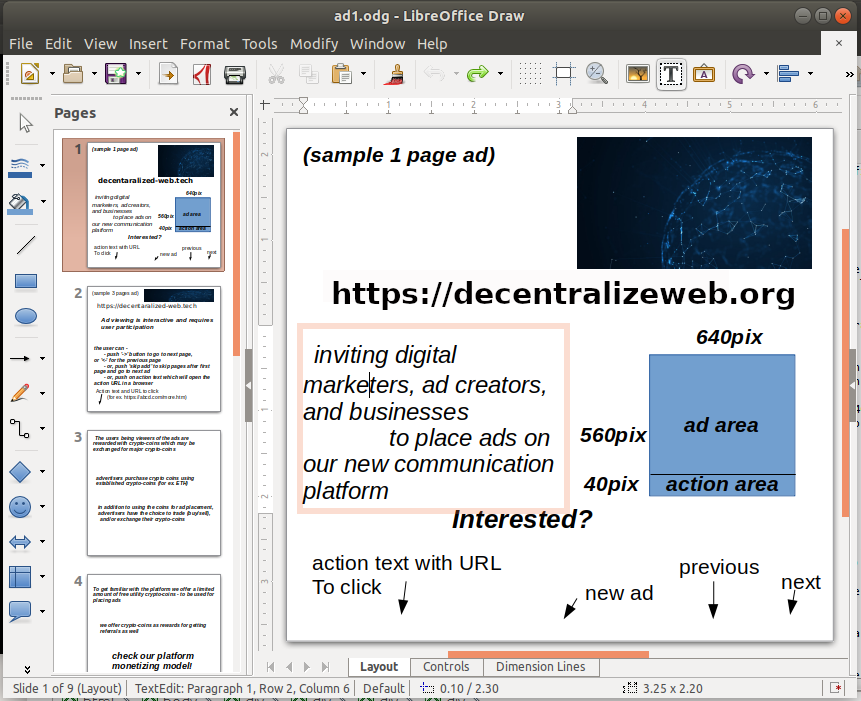
Use any graphics/image editor to create an image with size of 640 x 600 pixels. The image can contain text and graphics. Make sure the bottom/action
area is prepared to be compatible with the the color and text of the action items. Then do an export of the image to save it in a raw
'.ppm' format.
To create 1 , 3 and 5 pages ads we did use LibreOffice-Draw free image editor program on Linux OS. Since it did not have export to .ppm format we
did save the image created in a .gif format.
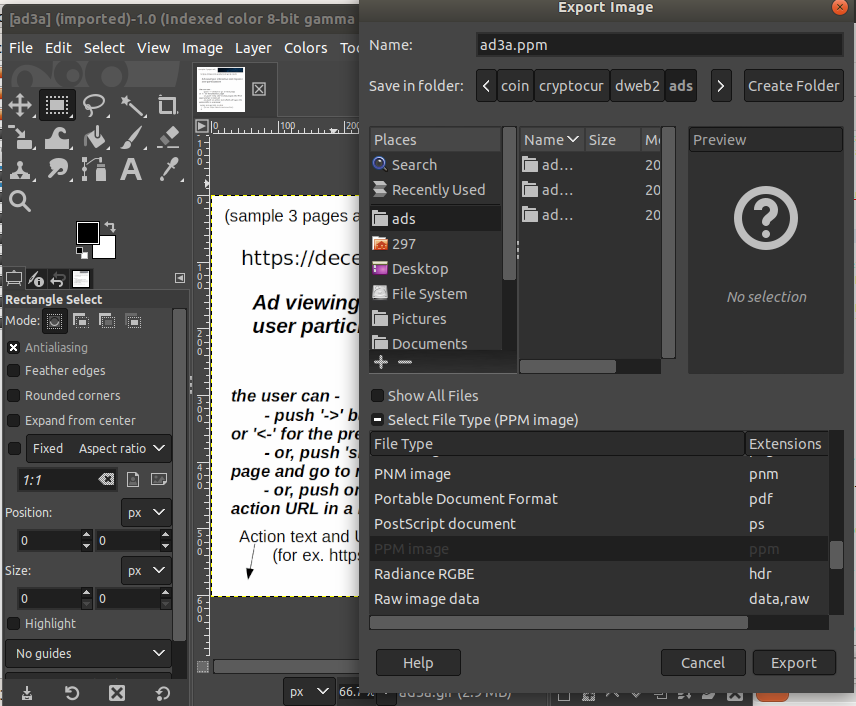
We did use another free image editor program - Gimp to open the .gif image and then do an export to the .ppm format. When exporting, there is a
dialog box asking to choose to save in ascii or a raw format. Please save images in a raw .ppm format.
Some of the .gif images we did create with LibreOffice-Draw were not exactly the 640 x 600 pixels. After loading the .gif in Gimp we did use
'scale image' tool to make it exactly 640 x 600 pixels and then we did export it to a .ppm file.
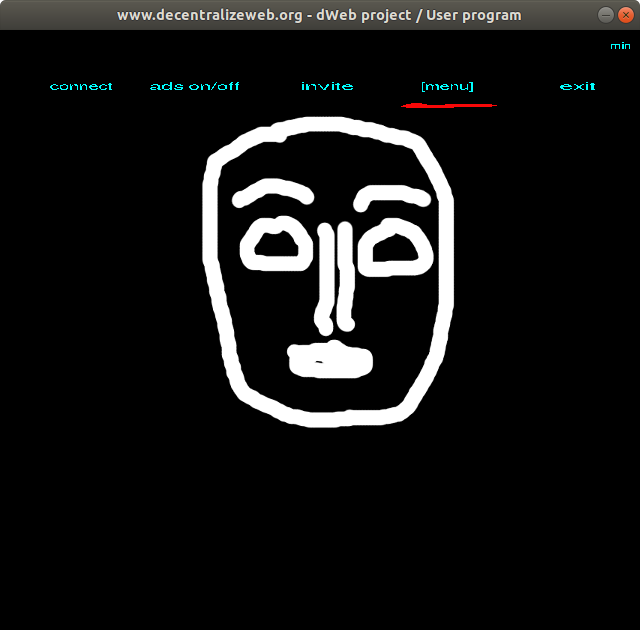
When started the dWeb User program shows this default screen. A left mouse single click brings the initial menu.
Click on '[menu]' - this will bring a browser tab with all of the settings for the User program.

Place from 1 to 5 '.ppm' image files of your ad in a folder that you choose.
Create new or modify an existing 'ad.txt' file - putting the names of the image files, the action text and and the action URL.
Then place it in the same folder.
In a browser tab with the settings menu for the User program - click on Import ads link. This will bring the following screen -
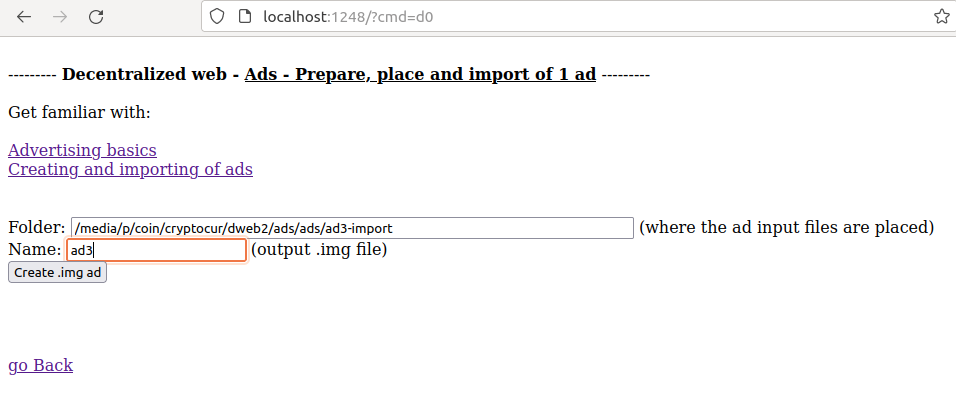
In this screen put the folder path where all files for the ad are placed, type the output name for the ad and push Create .img ad
button. This will generate a single '(name).img' file.

If this file is not created please check the sizes of the image files to be exactly 640 x 600 pixels .ppm file, and having the proper
format of the 'ad.txt' JSON file.
The location of all of the generated ad .img files to be displayed is in this folder-
c:\dweb\ad-import (Windows), /home/(user name)/dweb/ad-import (Linux), /Users/Shared/dweb/ad-import (Mac OS).
You can create, and import more ads as long as they have different file names - 'myad2.img', 'myad3.img','myad6.img'...
When started the dWeb User program shows this default screen. A left mouse single click brings the initial menu.
Click on '[menu]' - this will bring a browser tab with all of the settings for the User program.
In a browser tab with the settings menu for the User program - click on Show ads link. This will bring the following screen -
The User program screen will show the image of the first page of the first imported ad.

Go over to the bottom/action area and click over '-->' . This will bring the next imported ad.
Go over to the bottom/action area and click over 'skip' . This will bring the next ad. Then go over and click '-->' and '<--'.
This will bring next or previous page of the ad.
Go over to the left side of the bottom/action area and click over the action text. For example, for the 5 pages sample ad the action text
is - "Platform details".
This will result in bringing up of a new tab in Google Chrome web browser and loading the "action-url" page which for the 5 pages
sample ad is: "https://decentralizeweb.org/ad5.htm".
Wait for 10-15s without doing anything. This will cause a timeout in the ads viewing and bring back the default screen.